|
|
Post by Kozure Okami on Apr 8, 2015 4:22:37 GMT -5
Last week, I finally picked up the raw iyo zane that I had ordered from a company that laser cut them out of sheet metal. They are 0.75mm thick and of St1203 mild steel. This is 1200 of them plus a finished one, acting as a model piece: 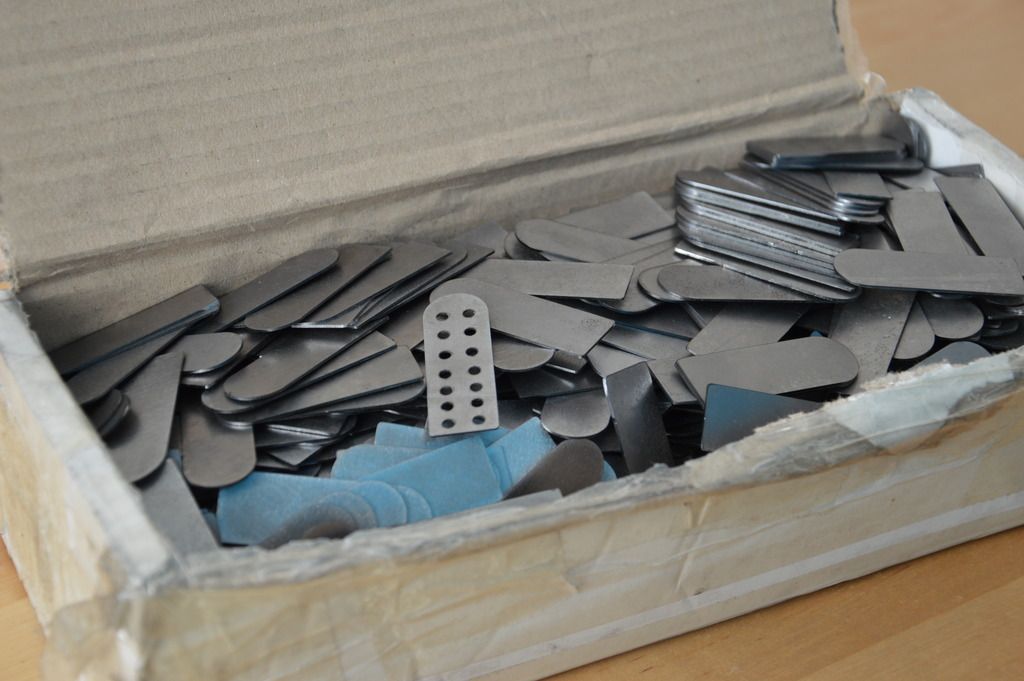 Not having a drill press at home, I have to make all the holes with a pliers-like hole punch that I bought. One advantage is that I can use it while hanging out with my wife in the living room  To get the holes right, I need to mark them first. For this job, I got an automatic punch mark:  As of now, I don't have a jig yet, so I place the model piece on a raw plate and eye-measure the middle of each hole before marking it. It works decently well - if the lighting is good  Either way, I'll try to get a coworker of mine to 3D-print a jig for me to speed up the marking process. This is what the results look like:  Another advantage of the hole punch is that it leaves only one side of a plate for deburring, the other side is smooth. For this task I use a countersink. Here is a comparison of the holes before and after deburring and the laser cut holes in the model piece:  As you can hopefully see, the hole punch also domes the plates slightly. I don't want this around the lateral axis - which is easy to correct, given the thickness of 0.75mm - but in the longitudinal axis it is very welcome, as it was recommended to me to dome the plates. I'm still in the process of sourcing some of the materials, namely epoxy resin and thin leather or hemp cloth to give strength to the laced together iyo zane, turning them into solid lames. That's why it's very likely that I won't be doing much in the next weeks, apart from punching hundreds and thousands of holes. So don't be surprised when there's no visible progress here for some time |
|
Deleted
Deleted Member
Posts: 0
|
Post by Deleted on Apr 8, 2015 6:20:17 GMT -5
I'm still in the process of sourcing some of the materials, namely epoxy resin and thin leather or hemp cloth to give strength to the laced together iyo zane, turning them into solid lames. A woodworking teacher turned me on to West System epoxies. If you use the 105 resin and the 207 hardener it's even food safe.1200 plates times 14 holes is only 16,800 holes.  |
|
|
|
Post by Kozure Okami on Apr 8, 2015 7:03:47 GMT -5
Food safe, huh?  Thanks, I'll check them out, but as shipping to Germany needs to be added to the price, I'm probably better off with local (as in national) sources. Apparently one of my coworkers is involved with gliders, he might know a good place - or maybe he's even able to get me some... That's the maths alright, but here's the thing: making the holes myself, I can just avoid the ones I don't need So it's about, let's say, 1500 holes less |
|
Deleted
Deleted Member
Posts: 0
|
Post by Deleted on Apr 8, 2015 7:29:13 GMT -5
Armor so safe, you can eat off of it*! (*Eating off of armor is not recommended.)They do have German distribution, but even in the USA they are a high-end product. More affordable options probably exist. |
|
|
|
Post by Kozure Okami on Apr 8, 2015 15:32:19 GMT -5
That sounds about right, apparently even urushi is food safe - once it's all dry and polished of course You're right, I just checked: there's a boat place only 9 miles from my place where they sell it. But I think I'm gonna ask my coworker first and see what he can do for me. Still, thank you for the tip! |
|
|
|
Post by Kozure Okami on Apr 25, 2015 17:00:40 GMT -5
Mark mark, punch punch, drill drill drill Turns out that the deburring part takes up most of the time that I spend making iyo zane. I don't know if that is due to the countersink drill becoming dull already (after only about 250 deburred holes...?) or if it is a better idea to use a different tool altogether. I'll let you know when I find out. Anyways, I was in the mood for some shita garami, so I tackled one of the two ichi no ita of the rear tateage (as a reminder: I'm going for a sanmai haramaki dou). Here are the front and rear view:   I use 3mm cow leather for both the shita garami itself and the kawashiki. Apart from running the cord in the upper row along the backside as the shiki, I use the lacing pattern shown on www.sengokudaimyo.com/katchu/katchu.ch04.html. Regarding the epoxy resin (as an urushi substitute), I've narrowed it down to 3 to choose from. Together with a sheet of cotton or maybe hemp, I will have everything I need to proceed until just before the top layers. Until then, many more holes will be punched... |
|
|
|
Post by Kozure Okami on May 11, 2015 4:29:28 GMT -5
Quick update: to not go completely mad, I decided to always make enough iyo zane for the next lame, deburr them and alce them up with shita garami. This way it feels less monotonous The deburring works better if I apply more pressure, it helps immensely to have a block of wood or something on which the scale rests while being deburred, rather than just holding it in my hand. Next week, I'll get together with a fellow student of mine who is part of a glider building and -flying student group. He'll show me how to work with resin so that I can order some and finally get started on my own |
|
|
|
Post by Kozure Okami on Jul 22, 2015 4:33:50 GMT -5
The next update - only 2 months later Just letting you know that I haven't given up on my armour, and I'm not planning to. I just got slowed down by some things, like vacations, toothing daughters and stuff. Here's what happened in the last few days: 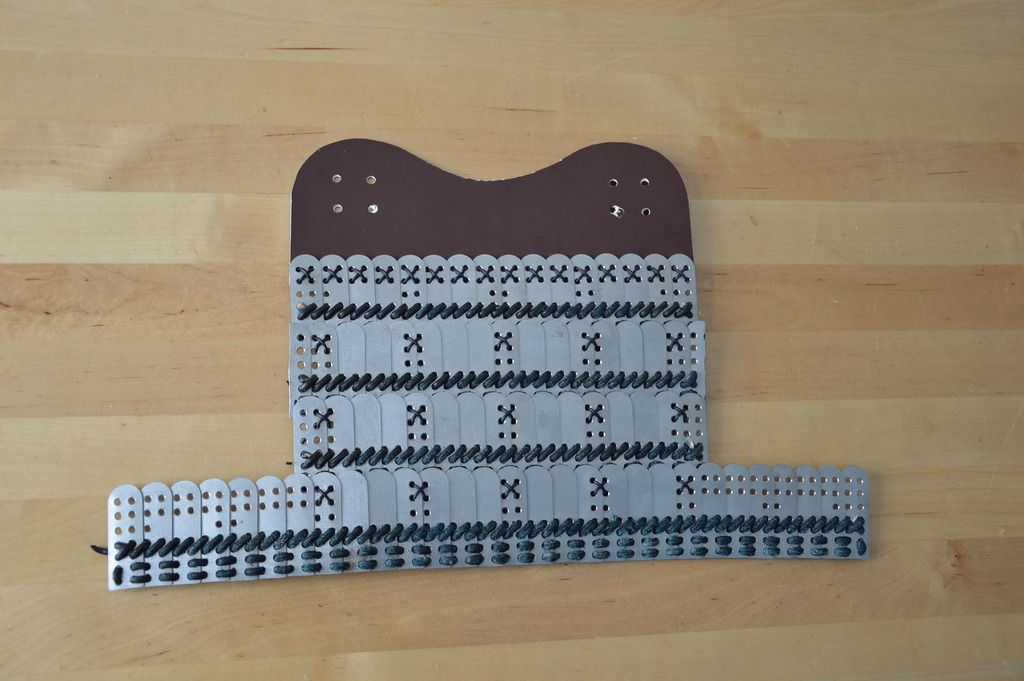 Now, I guess you're wondering why I'm applying the tomegawa already, way before the single rows are done. The reason is that I plan to rebuild my previous posterboard-mockup of the do using the untreated ita. This way I hope to figure out how to create the typical "belly shape" which is characteristic for the front of the nakagawa do. Furthermore, I want to find the perfect curvature before I start applying the epoxy resin. Another feat is that I can get the right measurements for the waki ita and muna ita done in posterboard before ordering the parts in metal and then having to trial and error my way to the right fit... |
|
|
|
Post by kirishitan on Jul 29, 2015 21:23:48 GMT -5
Looking good. I've been swamped with things too.
I take it you'll be leaving the metal unpainted then?
|
|
|
|
Post by Kozure Okami on Aug 1, 2015 5:26:12 GMT -5
Thanks man!
No no, when the time is right I will unlace the tomegawa, coat the lames in several layers of epoxy resin and then put everything back together. The first layers will be mixed with black and the top layers with brown colour paste.
|
|
|
|
Post by magnus on Sept 16, 2015 17:55:40 GMT -5
Looks amazing! What kind of hole punch are you using...one of those Chinese made whitney punches?
|
|
|
|
Post by Kozure Okami on Sept 18, 2015 15:42:10 GMT -5
Yes, it does look like a Roper Whitney punch, but I don't even know where it was made, I'd have to have a look... but it's a good chance it was made in China, considering how cheap it was. Edit: indeed, it is from China |
|
|
|
Post by Kozure Okami on Oct 20, 2015 5:09:20 GMT -5
Wow, another 3 months have passed... I feel like my progress is slowing down more and more as my daughter grows (she just turned 1 two weeks ago). But it might also be related to the fact that the first year of my paternal part time is over and my working hours increased because of that. Well, excuses... I've been tackling the second nakagawa no ita of the front part of the do. That in itself went quick and smoothly, as I stuck with my standard template for punching the holes. I had figured out that the second ita having just one more scale than the first would be enough to be able to neatly line them up on both ends, despite their circular arcs having a different lenghts. In order to help with the lining up, I prepared the piano hinges that I'm also going to use in the final assembly: 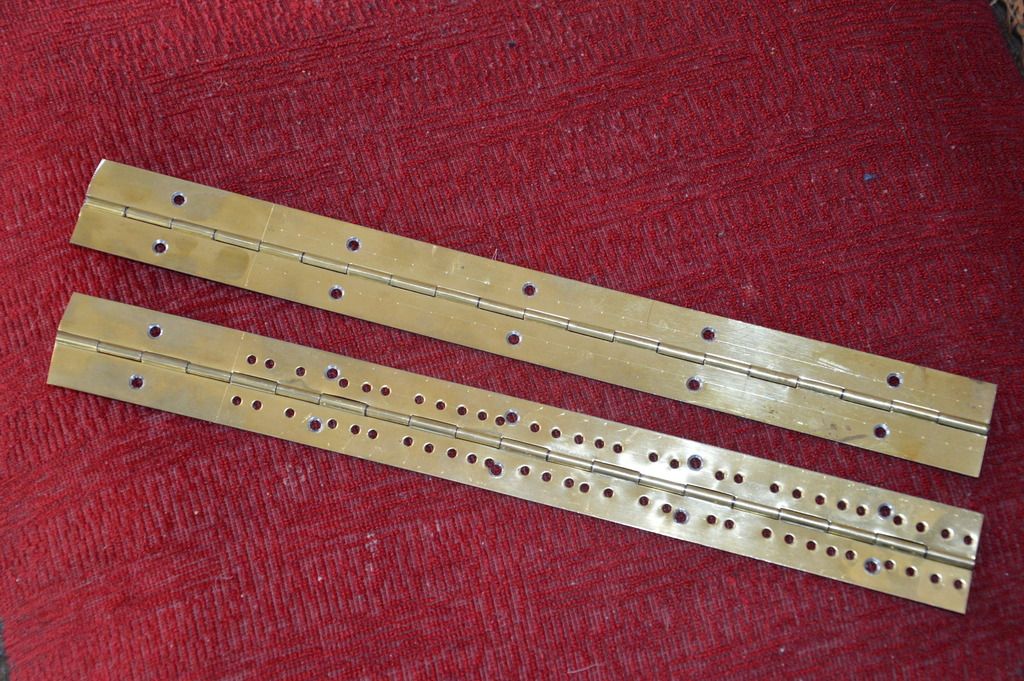 Lacing the pieces together with more tomegawa and adding posterboard waki ita, I get this: 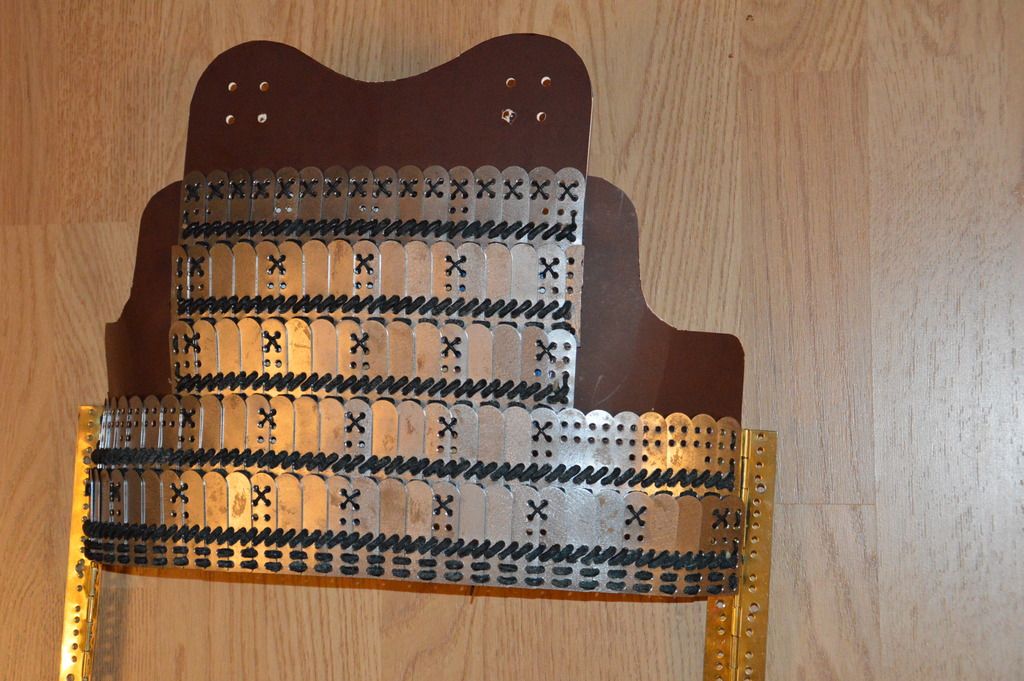 I forgot to take a photo of how the ends of both nakagawa no ita line up - that is, not as neatly as I thought - but I think this will improve when the ita are covered in epoxy and stiff. Just need to make sure the shape is correct... |
|
|
|
Post by thomas on Dec 6, 2015 15:48:10 GMT -5
Nice work.
|
|
|
|
Post by Kozure Okami on Dec 7, 2015 2:22:58 GMT -5
Thanks Thomas! I'm planning to post the next step some time this week. |
|


 Either way, I'll try to get a coworker of mine to 3D-print a jig for me to speed up the marking process.
 Thanks, I'll check them out, but as shipping to Germany needs to be added to the price, I'm probably better off with local (as in national) sources. Apparently one of my coworkers is involved with gliders, he might know a good place - or maybe he's even able to get me some...