|
|
Post by Ishida Kentarou Mitsumasa on May 12, 2013 14:27:18 GMT -5
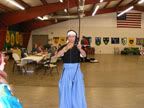
So there's this suikan in Jidai Isho no Nuikata. 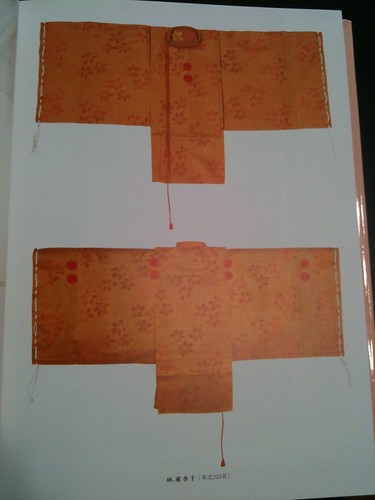 Suikan in Jidai Isho no Nuikata Suikan in Jidai Isho no Nuikata by tomlapille, on Flickr I recently went to an antique show that was basically a boat full of old things from Japan. I found an old clay sake bottle and some flatter sake cups, which are pretty cool, but I also found this bolt of silk that reminded me of the above suikan.  Suikan fabric sample Suikan fabric sample by tomlapille, on Flickr This is a lot brighter in person--it fades between a dark orange and a light brown. It's not as bright as the suikan in the book, but the flowers are close enough that I feel called to make a suikan out of it. It's a bit narrower than would be desired, but I can adjust things enough that it will only be a little out of proportion. I have some questions, however. a) Where on the body is the belt supposed to attach to the back of a suikan? The belt is not shown in the Nuikata pattern for some reason, perhaps because they took it from a Noh costume that didn't have that? Ishiyama-dono, your expertise would be very appreciated here. b) Do we have any more ideas about how to handle the slits for the sleeve cords? I did a little science with the end of the fabric, as shown here:  Testing sleeve slits for cord Testing sleeve slits for cord by tomlapille, on Flickr I don't hate how this turned out, and it doesn't fray horribly once I pull and cut the threads that get loose, but I'm not thrilled with the idea of having to cut about 60 of those slits across two sleeves with no room for error. I don't want to do extra loops. Doing actual button holes is another consideration, although that might make it look excessively modern. I find myself wondering if the cord slits were actually woven into the fabric, as that wouldn't be too hard to do and would make things pretty stable. c) From what I understand, I am supposed to wear lined sashinuki with a suikan. Here's one that Date-dono made, which is fairly typical in what I've seen with regard to the white upper section and darkly colored lower section:  I'm interested in trying this, although that will likely need to wait until after this project is done. Is this effect accomplished by assembling the hakama entirely and then dip-dyeing? |
|
|
|
Post by Please Delete on May 12, 2013 16:16:12 GMT -5
I don't believe that a belt attaches to the suikan. You see the belt (an "ate-obi"--of matching fabric) attached for some modern versions, but I've not seen any evidence of that as a period practice (though I could be wrong) and I suspect you just use a thin obi of the same material. Either way, it should go at your hip level, when worn.
Simple cuts seem the most common form for doing the cords. I have one test piece that I then put through the wash--and no problems. Most of our vintage pieces are like that, though there are cases for "button holes". In order to look right, though, they have to be consistent, and I think slits are less work. Plus, remember, you don't usually use the cords at this stage--they are mainly decoration except in hunting outifts or armor-clothes (and those sleeves are usually more practical). Eventually the cords dwindle until they are just decorative loops hanging off the ends of the sleeves.
-Ii
|
|
Deleted
Deleted Member
Posts: 0
|
Post by Deleted on May 12, 2013 21:31:16 GMT -5
a) Where on the body is the belt supposed to attach to the back of a suikan? The belt is not shown in the Nuikata pattern for some reason, perhaps because they took it from a Noh costume that didn't have that? Ishiyama-dono, your expertise would be very appreciated here. I agree with Ii-dono that the belt is not attached. I have made suikan with the belt attached, and it's very difficult to attach it in the correct place, so just keep it unattached. If you're worried about it getting lost, tack-stitch it in the center so it's easy to remove. All reports say that the fabric is simply slit where the lacing passes through on every historical example. Then again, I have my theories about how rarely those examples were laundered. (That is, "never") For most of the ones I've made, it's machine-stitched buttonholes. Many mid-range machines do automatic buttonholes which greatly speed this process. If you can match the thread colors. the buttonholes are barely noticeable. That's my guess. The dyeing is so even across panels I think it would be more difficult to do any other way. |
|
|
|
Post by Ishida Kentarou Mitsumasa on May 12, 2013 21:37:01 GMT -5
Thank you both for the advice.
I've made some progress, and will post pictures later tonight. Given how the color of the fabric has a pattern that fades in and out, I don't think I'd be able to make button holes invisible. I'm planning on just doing slits, as this will likely be an entry into some A&S contest and I plan on laundering it not very often.
|
|
|
|
Post by Ishida Kentarou Mitsumasa on May 12, 2013 23:43:21 GMT -5
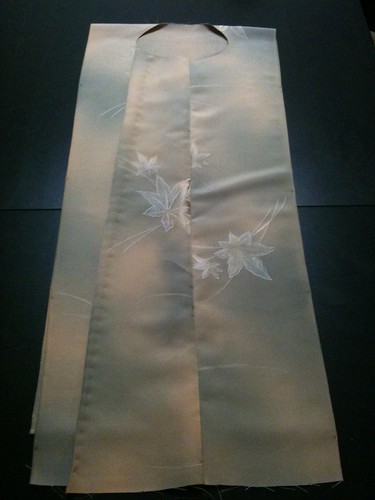 Flower brocade Suikan, progress 1 Flower brocade Suikan, progress 1 by tomlapille, on Flickr Here's where I ended tonight. I'm not sure how I feel about the hand finishing details; I elected not to cut down the left edge as much as I could have in the name of leaving fabric unmarred as much as possible, but it looks slightly funny to me now. This is an oddly simple project. I somehow expected this to be super difficult, and the pattern is unfamiliar, but it seems that the majority of the work will be in the hand finishing rather than construction. |
|
Deleted
Deleted Member
Posts: 0
|
Post by Deleted on May 13, 2013 8:41:37 GMT -5
I'm planning on just doing slits, as this will likely be an entry into some A&S contest and I plan on laundering it not very often. If you're super worried about fraying, you could apply a product such as "Dritz Fray Check" to the edges of the slits. Try it on your scrap piece first, as it will often change the color and texture of the fabric. Better than having your fabric dissolve into threads, though. Here's where I ended tonight. I'm not sure how I feel about the hand finishing details; I elected not to cut down the left edge as much as I could have in the name of leaving fabric unmarred as much as possible, but it looks slightly funny to me now. I think it looks good. Then again, I think it looks good because I can tell by looking that you are trying to keep from cutting fabric off if you can, and I concur with your decision.  The biggest difficulty is in the amount of fabric involved, and actually in the shortage of constructive sewing. More seams would help keep things straight. The openness comes back to haunt you when it's time to put the thing on, too, but you're probably used to that from your hitatare work. (If I tie the bottoms corners of my sleeves into my hakama himo one more time... Don't underestimate the work necessary on the collar, though. I'm also looking forward to seeing your solution to securing the right-side overlap at the left-side shoulder. I haven't been happy with any of my solutions and have mostly devolved to a couple of safety pins inside. |
|
|
|
Post by Ishida Kentarou Mitsumasa on May 13, 2013 12:38:49 GMT -5
I'm also looking forward to seeing your solution to securing the right-side overlap at the left-side shoulder. I haven't been happy with any of my solutions and have mostly devolved to a couple of safety pins inside. I was hoping that the wide hem at the top of the left shoulder would act a little bit like boning to help keep it straight. We'll see what happens when I get there. |
|
|
|
Post by Please Delete on May 13, 2013 19:17:53 GMT -5
The inner part of the collar is often a pain. There are examples of internal ties for it, but most do not. It seems that it relied on both a) using paper to stiffen the collar to better hold its shape (JIN mentions 7 layers of "papier mache"), b) the shape of the collar (it straightens out rather than curving up as much, so it stays under the outer collar), and c) the obi should be able to hold the fabric in place (but this is more difficult with slippery fabric).
That said, none of those are great solutions. I do find that the more layers I wear the better it seems to stay in place.
Also, because I've never made suikan, I'm not sure how to do the cords, exactly. I think that one attaches at the middle of the back of the neck and the other at the collar end, so that you can adjust them somewhat, but I would need to look at the patterns again to be sure.
-Ii
PS: One thing I didn't mention--we do have a noushi with a cheat button hidden on the inside to keep things together. Not period, but it works, and simiar things are used in modern period costume.
|
|
AJBryant
New Member
 甲冑師 katchuu-shi
Posts: 1,972
|
Post by AJBryant on May 13, 2013 22:45:36 GMT -5
[quote author=ii boardAlso, because I've never made suikan, I'm not sure how to do the cords, exactly. I think that one attaches at the middle of the back of the neck and the other at the collar end, so that you can adjust them somewhat, but I would need to look at the patterns again to be sure.[/quote] Bingo. |
|
|
|
Post by kazuyama on Aug 3, 2013 11:45:49 GMT -5
Sorry for popping in so late, I've been busy with a few projects. Everything looks great. I've made a few Suikan and I have nothing to really add except this looks like it has turned out really great. As for the hakama, assemble it first. If you dip dye it and then assemble it, it may not be perfectly even. What I did was I soaked it in water first and then dip dyed it after assembling the whole thing. I think you pretty much have it all figured out from there. I never added the suikan no kikutoji, or the reinforcement items as I never really figured out how to do that one very well
|
|