Post by Deleted on Sept 25, 2019 10:57:06 GMT -5
Long ago, I made a gusokubitsu for somebody else to give as a present, and recently I realized that I needed a sort of "backpack carryall" for general use and didn't have one. Rather than buy one of those basketry backpacks from the Basket Man at Pennsic, I decided to just make a "slightly smaller than armor box" hitsu for myself out of plywood and lumber I already had in the shop, using as much "hardware store" materials as possible to keep it easy to recreate.
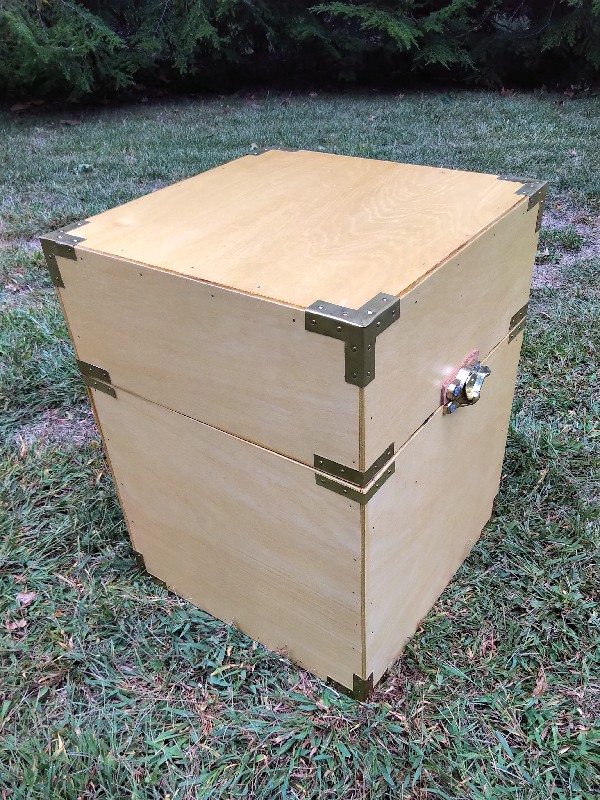
Here's what it looks like from the "front". I'm not happy with the latch, but I needed something beefy and could not find something quickly. I'm really happy with the corner hardware, because I made it myself from sheet brass. The body of the box is all thin plywood, to keep weight down. The overall box is about 19 inches tall, with a 13 by 13 inch footprint.
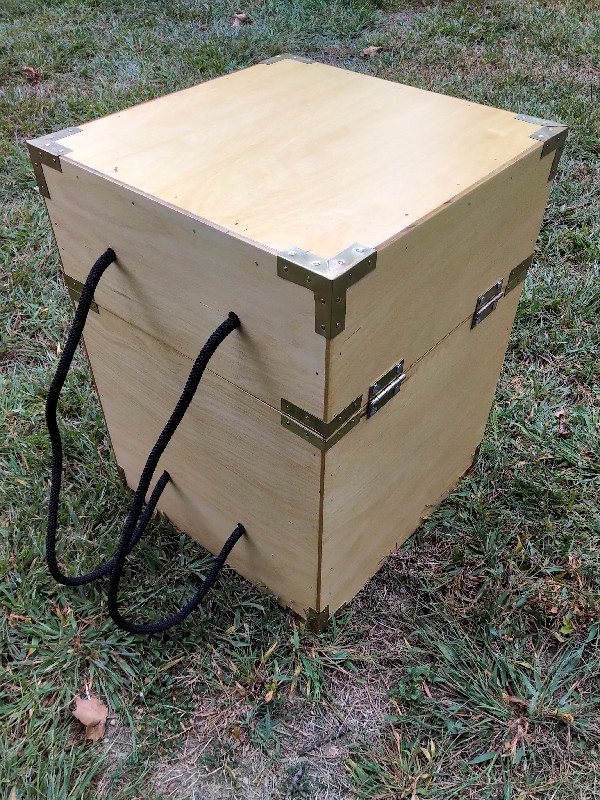
Here are the other two sides. The hinges are just simple brass hinges from the hardware store. Rather than use the Philips-head screws those come with, I used roofing nails to attach them. We'll see how those hold up in the long run, but the work pretty good right now and look much better than screws. The straps are just some nice half-inch rope I had around. I do eventually want to hand-braid some wider straps, but I wanted to get this project into usable shape quickly.
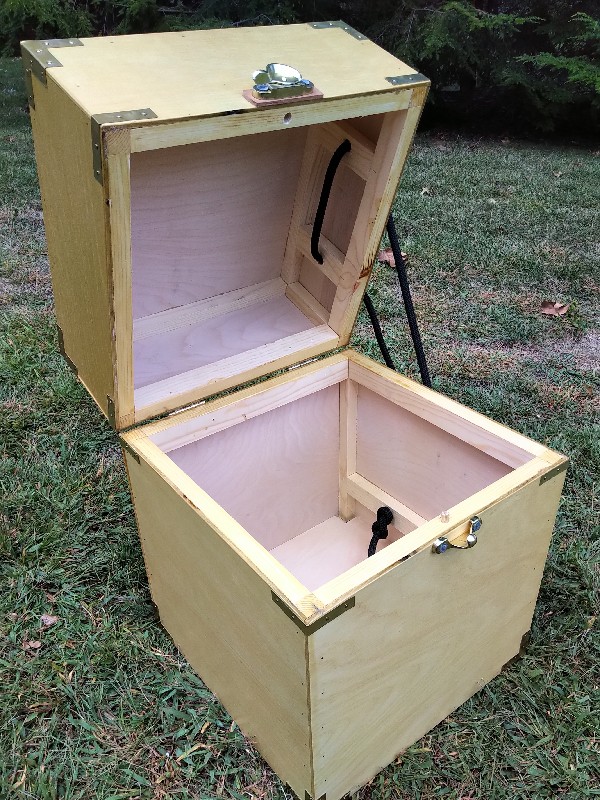
Here we are with the open lid. I feel like I made the lid a little tall. It is six inches tall, when three inches probably would have been sufficient. With the lid open, you can see the 1by1 framing along all the edges. This gives the glue and fasteners more to attach to, without having to use thick walls everywhere and greatly increase weight. There is framing around the bottom, but I actually built a secondary "floor" on top of the framing, so that objects in the box aren't resting directly on the bottom. You can also see how I reinforced for the ropes. You can also see the little peg I put in behind the latch that makes sure the lid stays lined up when it's closed.
I still have to make and attach the bail handles. I plan to bend those out of brass rod, and my local store is out of it.
In theory, I could make these almost any size using the same methods. This one is a good size for the student marudai that I made several years ago.
Here's what it looks like from the "front". I'm not happy with the latch, but I needed something beefy and could not find something quickly. I'm really happy with the corner hardware, because I made it myself from sheet brass. The body of the box is all thin plywood, to keep weight down. The overall box is about 19 inches tall, with a 13 by 13 inch footprint.
Here are the other two sides. The hinges are just simple brass hinges from the hardware store. Rather than use the Philips-head screws those come with, I used roofing nails to attach them. We'll see how those hold up in the long run, but the work pretty good right now and look much better than screws. The straps are just some nice half-inch rope I had around. I do eventually want to hand-braid some wider straps, but I wanted to get this project into usable shape quickly.
Here we are with the open lid. I feel like I made the lid a little tall. It is six inches tall, when three inches probably would have been sufficient. With the lid open, you can see the 1by1 framing along all the edges. This gives the glue and fasteners more to attach to, without having to use thick walls everywhere and greatly increase weight. There is framing around the bottom, but I actually built a secondary "floor" on top of the framing, so that objects in the box aren't resting directly on the bottom. You can also see how I reinforced for the ropes. You can also see the little peg I put in behind the latch that makes sure the lid stays lined up when it's closed.
I still have to make and attach the bail handles. I plan to bend those out of brass rod, and my local store is out of it.
In theory, I could make these almost any size using the same methods. This one is a good size for the student marudai that I made several years ago.