|
|
Post by mrcunningham on Aug 20, 2006 18:18:59 GMT -5
OK, so my yari died two weeks before Pennsic. The pool noodle makes great padding, but terrible blades. Hence, the last day before driving down to Pennsylvania I made a new one! (I didn't have time to post this before leaving.) Having returned, with the design now battle-tested, I can say this method really works. In the second field battle, I was able to use literally every part of the yari - I got kills with the buttspike, the long blade, and the thrusty, plus used the cross blade (is there a technical term for this?) for kills, legs, and to hook a shield for a spear gack. Yes, all in one fifteen minute battle. This weapon is a melee monster, and even Tuchux will take the hit. Directions follow. Total construction time, minus drying, was about four hours. Start with an old tire. Cut out seven pieces: four 4" by 2.5", two 3" by 2.5", and one 6" by 2.5". 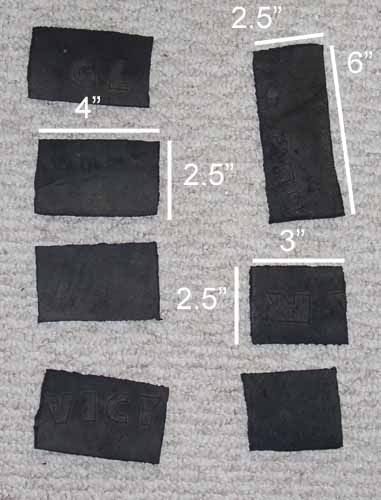 It should use about half of one side of a decent-sized tire. About this much: 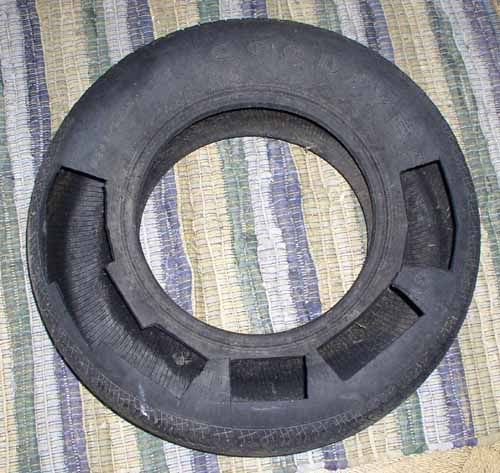 Using whatever super-strong glue or epoxy you favor (I like Gorilla m'self), assemble the head. Do this by gluing the 4" by 2.5" pieces together, two at a time, as illustrated. These form the core of the head. I used strapping tape to hold the pieces together as the glue set, which was critical in making sure the slightly curved pieces of rubber actually straightened out. Then glue onto this core your 3" by 2.5" pieces, one on each side abutting the same end. (The end will end up measuring at least 1.25") You should end up with a sandwich of the six pieces, with the larger pieces in the middle, like so:  When everything is square and dry, affix the core to the rattan so that the thickest side is facing away from the rattan. Do this about 15" from the end to give you a nice, long blade. You don't need to do this permanently, because you then wrap the 6" by 2.5" piece of tire around the other side of the rattan so that the ends line up with the gaps on the side of the head "core." Glue the bejesus out of the whole thing and let it dry. I used zip ties to secure the lot, because it did get slippery there. 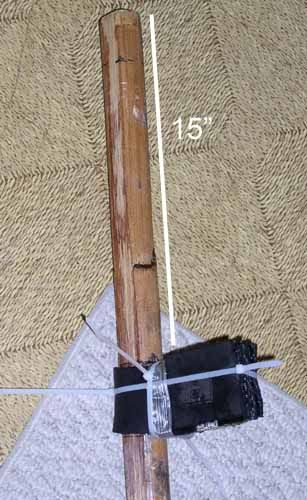 Wrap a strip of leather tightly around the end of the head and strap it, and everything else, in place. Seriously, use a boat-load of tape. This thing is going to need to take a whole heck of a lot of abuse. 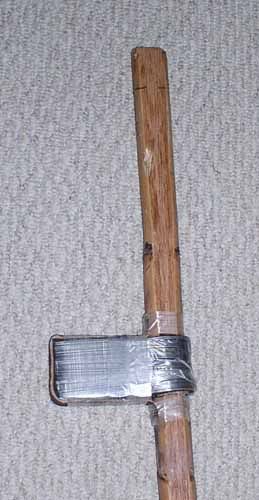 Pad the striking end of the head with about an inch of foam. It sounds like a lot but, again, it'll take a lot of abuse, and the weight will easily transfer through. [PHOTO MISSING. GOMEN NASAI.] Now you can tape and decorate the head to your liking. Don't forget the thrusting tip! 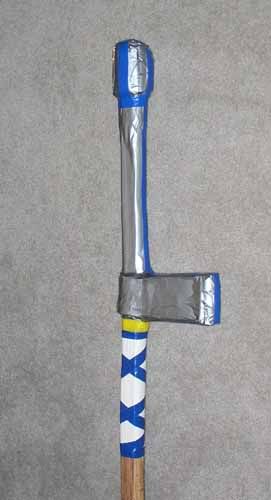 Congratulations, you are now ready to destroy shieldmen in style. |
|
|
|
Post by Ishikawa Yoshimasa on Aug 24, 2006 22:02:04 GMT -5
forgive me if I am mistaken, but isn't the single sideblade yari called by a different name? I could have sworn jumanji yari where double sided giving a "t" shape... though the construction method SHOULD work for any of the projection types with some refinement.
I am concerned about the steel belting... do keep an eye out as the weapon wears and tears for stray belting trying to poke through. I have made other things with tire scraps and trust me stray belting can be quite uncomfortable...
overall I LIKE the idea... I am definatly going to have to consider it for my own yari projects<G> even better the life expectancy of a steel belted radial as a core for a weapon should be very high as it will not deteriorate due to moisture like leather would, and is designed to take more abuse than the ratan would likely withstand... the belting SHOULD be suficient to prevent it from ever ripping off.
|
|
|
|
Post by Takeda Sanjuichiro on Aug 24, 2006 22:11:34 GMT -5
I am concerned about the steel belting... do keep an eye out as the weapon wears and tears for stray belting trying to poke through. Get a bias-ply tire (nylon cording) viola... no steel belting to wory about. Or better yet, use sole leather... though it is more expensive, it yealds a much lighter weapon... vulcanized rubber is heavy -Takeda |
|
|
|
Post by mrcunningham on Aug 24, 2006 22:47:31 GMT -5
How right you are, Ishikawa-dono. Some cursory research reveals that the weapon is, in fact, a "katakama." *Gomen nasai*
Takeda-dono, I will have to look into leather for the next one. The head really is heavier than it perhaps ought to be. I like the help it gives me on my hits, but it's hardly the most fluid weapon now.
|
|
|
|
Post by Takeda Sanjuichiro on Aug 24, 2006 23:02:45 GMT -5
I will have to look into leather for the next one. The head really is heavier than it perhaps ought to be. I like the help it gives me on my hits... Sir Justus here and Atlantia made a nice bearded axe out of leather, it is stunning... especially when he smites you with it. He had posted pics on AA... couldn;t find them with a cursory search. -Takeda (personally stunned by Sir Justus on several occasions) |
|
okami
New Member

Posts: 1
|
Post by okami on Oct 7, 2006 9:46:06 GMT -5
Is there Any reason NOT to use a piece of rattan cross mounted with "thrusting Tips" for safety???
I have no wisdom. Simply questions.
|
|
|
|
Post by Otagiri Tatsuzou on Oct 7, 2006 10:12:34 GMT -5
You have to be careful of too much weight ... both for the weilder and the target.
Its difficult to secure the crossbar solidly with just tape, rattan, and foam. Some marshals may not like the materials you use when securing the cross piece.
But I did enjoy working with mine, if just for the experience. I used barrel plastic, small screws, epoxy, and covered all that with leather (to keep any loose screws from escaping) for the joint. I may make another some day with different materials. I keep thinking that radiator hose and rattan should come together some way to make a jumonji yari that is both strong and light.
Hmmm... I just had an idea that involves no rubber hoses! ;D
|
|
|
|
Post by Ishikawa Yoshimasa on Oct 15, 2006 18:39:09 GMT -5
the drawback to the radiator hose idea is that it creates a curved blade... a friend quite some time ago used one for a trident to use in an unusual weapons tourniment.
I have been doing some experiments, and I think I will be able to laminate a nice hollow head of tire rubber to make a full jumanji-yari head... this involves mr cunninghams base idea, but cutting the center pieces to make them voided rectangles instead of regular rectangles... I will have to give it much pell work to figure out if it will hold up using the side pieces alone as strength as the voided sections will to more for creating shape than substance.
if I find some bias ply tires that are wore out I will definatly have to try then instead... but last I looked around the areas tire shops, even the large scrapped mud tires where radials... those always used to be bias ply.
|
|
|
|
Post by mrcunningham on Oct 15, 2006 19:07:19 GMT -5
You know, every time I think this bad boy is too heavy, I am corrected. I refer specifically here to Kingdom Crusades the other weekend and trying (and succeeding) at smashing Atlantian shield walls. For lack of a more articulate summation: BOOM!!!
|
|
|
|
Post by Kano Hiroyoshi on May 17, 2010 12:07:20 GMT -5
I call on the dark forces of the internet to revive this dead thread! Is there Any reason NOT to use a piece of rattan cross mounted with "thrusting Tips" for safety??? This is exactly what I did with the jumonji yari I just finished. It has a split piece of rattan that I laminated perpendicular to the shaft, with legal thrusting tips on each end. You have to be careful of too much weight ... both for the wielder and the target. Its difficult to secure the crossbar solidly with just tape, rattan, and foam. Some marshals may not like the materials you use when securing the cross piece. I had no difficulty securing the crossbar. Strapping tape when rolled up is as strong as rope, so I used that to wrap the crossbar and secure it to the haft. I then wrapped extra duct tape to keep the strapping tape in place. If done thoroughly it is very solid and will not move or wobble. This is the same method my brother-in-law uses for his greatsword crossbars. The weapon is quite light, despite all the extra tape wrapped around the crossbar. I have only used it once in practice, and it is WICKED. Because of the extra reach on the head it goes right past most static blocks. It hits solidly without being hard or excessive. I hope I'll have a chance to use it in melee next month (financial problems may prevent us from making to war). I went with the full 7 1/2 foot length to give me more reach in melees, though in the future I may make a 6 foot version to use in tournaments versus shields. I will post pics when I get the chance. |
|
|
|
Post by norumanjin on May 19, 2010 7:16:31 GMT -5
"I had no difficulty securing the crossbar. Strapping tape when rolled up is as strong as rope, so I used that to wrap the crossbar and secure it to the haft. I then wrapped extra duct tape to keep the strapping tape in place. If done thoroughly it is very solid and will not move or wobble. This is the same method my brother-in-law uses for his greatsword crossbars."
Soak some leather straps for a few hours so they get very pliable, lash and tie the piece inplace with them. the leather will shrink into place, and the knots won't come out.
|
|
|
|
Post by Kano Hiroyoshi on Jun 3, 2010 22:37:12 GMT -5
Soak some leather straps for a few hours so they get very pliable, lash and tie the piece inplace with them. the leather will shrink into place, and the knots won't come out. That's the method my father recommended, and I may try it with subsequent models. Anyway, here are pics. My kingdom is currently experimenting with "low-profile" thrusting tips on great weapons. The head cross section only has to be 1.25 inches, as with one handed swords instead of 2 in. like the manual says. I originally constructed the yari following these guidelines:  After it was finished, I asked the deputy kingdom marshall about it and he thought that the low-profile thrusting tips only applied to greatswords, not all great weapons. So I redid it with larger thrusting tips. It seems safer, though still hits with a lot of force.    Need to get some grip tape and wrap at least part of the handle. |
|