Mega Zenjirou Yoshi
New Member
 The Scadian formerly known as Lord Drogo Bryce of Middlefordshire
Posts: 175
|
Post by Mega Zenjirou Yoshi on May 5, 2013 1:22:19 GMT -5
Yagyu-dono, that is one of several reasons why I need more practice lacing. I wasn't worried about it at first, but as this was laced, I realized exactly what you describe.
|
|
Lash
New Member
perfection isnt an end result but a path to walk upon with your eyes closed.
Posts: 422
|
Post by Lash on May 6, 2013 0:39:52 GMT -5
what you can do ,like i did, is to use a sharpie of a severe contrasting color to mark your holes.
i used grid paper ,drew my holes, punched them out and then laminated the card for future use as you can use the same pattern for all your lacing . then used the sharpie to stencil the hole pattern onto the material.
then either drill press the holes or use a cordless screw gun to be the most accurate. as i said before i did use a whitnet punch but hd to severly modify it to be be able to use it properly by grinding the head down so you can see what your doing.
another quick point as your lacing pinch the lace inhalf width wise as your puting it thru the hole and hold it creased as you tighten it up . leave it a slight bit loose so you can get a fuller look. hope that helps!! ;D
|
|
|
|
Post by tattoosbyjay on May 13, 2013 21:10:30 GMT -5
does anyone know how much to blow these up after they are printed ? what is the width of the strips i could just blow them up until the measurment is right thanks Reichmann, All of the patterns used were from Sengoku Diamyo site. The dô patterns are on this page: www.sengokudaimyo.com/katchu/katchu.ch07.htmlOn the right hand side of the page there will sometimes be a gold rectangle interspersed with the text. Those are links to patterns. This dô use the new style front and back. www.sengokudaimyo.com/katchu/graphics/patterns/NewDoFrPattern.PDFwww.sengokudaimyo.com/katchu/graphics/patterns/NewDoRPattern.PDFI have access to a drill press, but I'm thinking a hand held punch like a Roper Whitney jr. will make quicker work of it, with less clean up. I'm just guessing here, but I think it will be easier to use on already shaped pieces, as well. I want to wait to punch holes until the plates are all formed, to avoid distortion of the holes, and ensure they line up properly. The silver is a silver sharpie marker. I hope it comes off, too! |
|
|
|
Post by roninpenguin on May 14, 2013 0:01:24 GMT -5
Most of the patterns on the site say how much to blow them up, I used photoshop. If you notice on the Do pattern in the upper left hand corner it says "One Half Actual Size".
Having said that you still are going to need to play with them to dial them in. I had to add an extra 10% to the Old Do patterns when I made the final patterns.
|
|
|
|
Post by tattoosbyjay on May 14, 2013 0:25:35 GMT -5
thank you i will give that a try Most of the patterns on the site say how much to blow them up, I used photoshop. If you notice on the Do pattern in the upper left hand corner it says "One Half Actual Size". Having said that you still are going to need to play with them to dial them in. I had to add an extra 10% to the Old Do patterns when I made the final patterns. |
|
Mega Zenjirou Yoshi
New Member
The Scadian formerly known as Lord Drogo Bryce of Middlefordshire
Posts: 175
|
Post by Mega Zenjirou Yoshi on May 14, 2013 21:58:59 GMT -5
does anyone know how much to blow these up after they are printed ? what is the width of the strips i could just blow them up until the measurment is right thanks This is one of the times where it really pays to read all of Effingham-sensei's site repeatedly. But, to give you some idea from my personal experience. First of all I am 6 foot, about 160 lbs, and have a torso that almost a perfect tube; in my skivvies, iam about 34" around in the chest, waist, and hips. With room for arming clothes and/ or padding, the listed recommendations for blowing up the patterns came out just right. For me the gotchas were the watagami, because I missed the recommendation to tailor the length to a custom measurement, and the sode, because I wanted a lesser width for a more modern look. Another thing to consider is that your printer may try to shrink things a bit to allow for margins, be sure you truly printing the pages at the percentage you want. And of course make a poster or cardboard pattern first, tape that together and try it on. If in any doubt, take some pictures and post them here. There are very knowledgeable folks who will be happy to give you some fitting advice, but their job will be easier if they can SEE what you are attempting. |
|
|
|
Post by roninpenguin on May 15, 2013 0:31:08 GMT -5
Another thing to consider is that your printer may try to shrink things a bit to allow for margins, be sure you truly printing the pages at the percentage you want. And this is how my daughter got a Kabuto.  |
|
Deleted
Deleted Member
Posts: 0
|
Post by Deleted on May 15, 2013 6:29:00 GMT -5
Another thing to consider is that your printer may try to shrink things a bit to allow for margins, be sure you truly printing the pages at the percentage you want. Oh goodness me, yes. This silent shrinkage has caught more people in more contexts than I care to think about. It's not usually the printer, most often it's Adobe Acrobat. Reader will, by default, shrink a document so that it fits inside the margins on the paper you've selected, even if that document already has margins and is designed to fit on the paper you've selected. Make sure that (in version 10, anyway) in the print dialog under Size Options you choose "Actual size" and not any option containing the word "Fit" or "Shrink". It can also be your print driver as well, so make sure to check the printer properties and select "normal" or "actual" size setting. |
|
|
|
Post by tattoosbyjay on May 15, 2013 10:39:51 GMT -5
thanks for all the info guys, i started making my templates yesterday from the armor i have (authentic armor) i have most of it cut out and im going tape it together and make sure it looks right then ill start doing my leather work , thanks again for all the help on the sizing matter
|
|
Mega Zenjirou Yoshi
New Member
The Scadian formerly known as Lord Drogo Bryce of Middlefordshire
Posts: 175
|
Post by Mega Zenjirou Yoshi on Jun 5, 2013 21:37:10 GMT -5
Slowly but surely making progress.
All the Sode and kasuzuri lames are cut and top edges scalloped in an attempt at kiritsuke and lames are appropriately shaped.
I think I've finalized on graph paper how the holes will be laid out, and will soon begin hole punching and lacing tests.
But I have a question: Were nodowa ever done in kiritsuke iyo zane? I think it would be nice looking, but have only seen period examples in straight lames or hon kozane.
|
|
Mega Zenjirou Yoshi
New Member
The Scadian formerly known as Lord Drogo Bryce of Middlefordshire
Posts: 175
|
Post by Mega Zenjirou Yoshi on Jun 23, 2013 0:42:14 GMT -5
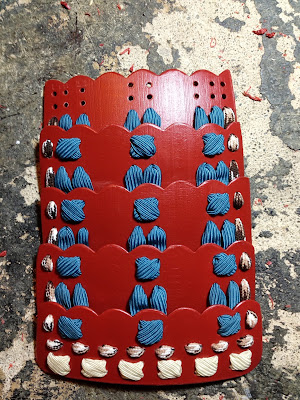
Another progress report. Been playing scalloping the edges of lames for a low end, yet period, kiritsuke iyo-zane. Made some attempts at scribing lines for the zane with a wood burning tool, but they were unsuccessful. Started out with idea of just doing this on the dangly bits, but was so happy with the results that it has pushed me to doing the whole dô as nuinobe. Still shaping the torso lames, and haven't begun hole punching on them yet. But I have punched holes, shaped, scalloped, etc. the Sode and kusazuri lames. They are ready for lacing. I spent a lot of time experimenting with layouts for hole placement, and coming up with the right technique for hole punching. Thanks once again, to Lash-dono for the advice about doing a lot of trials on these steps. The strategy I ultimately used for laying out and punching holes was to make a template on 1/8th grid paper, and punch the holes in the paper using the smallest size on a rotary leather punch.the template was then taped to the lame and using the smallest size bit on a dremel heat/wood burning tool, branding a small dimple in the plastic where the hole should be. Then with a work light adjusted "just so" it was pretty simple to get the Whitney punch centered where it needed to be. After getting all the dangly bits punched, I hit the edges with a propane torch too smooth out the rough bits left from cutting the lames, beveling edges with a sureform rasp, and punching the scallops out with a leather belt end punch. I didn't originally intend to hit the edges of these lames with the flame, but I'm glad I did. Not only do they look cleaner, and more like the period kiritsuke iyo-zane examples that inspired me, that small amount of heat treating has made them much more rigid, and hopefully more protective. Here's one of the kusazuri right before torch edging [img src=" 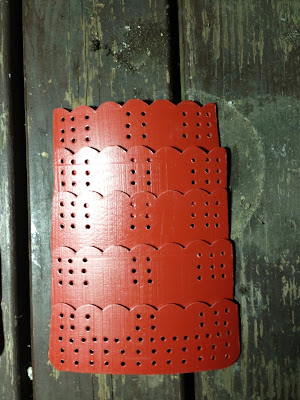 g" alt=" "] 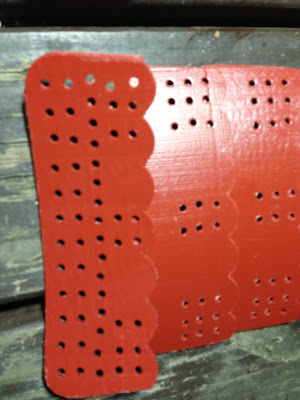 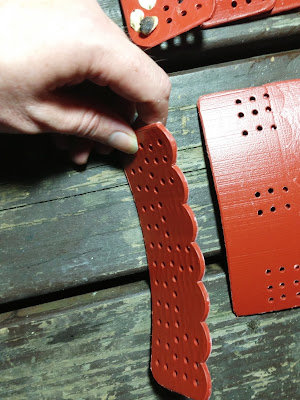 And here is after 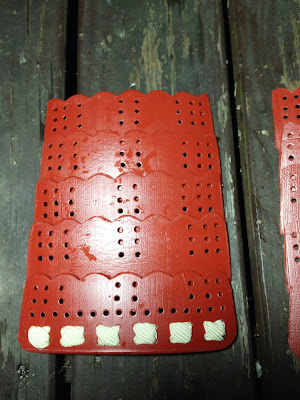 From the back 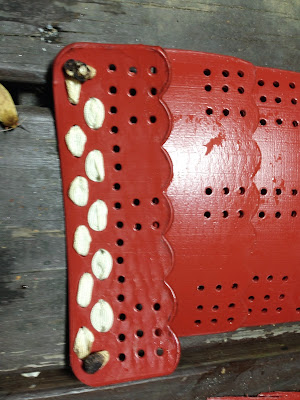 From the top 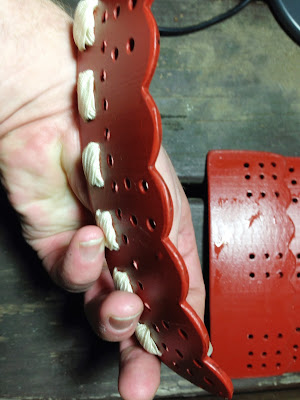 Progress has also been made on shaping the suneate. |
|
Mega Zenjirou Yoshi
New Member
The Scadian formerly known as Lord Drogo Bryce of Middlefordshire
Posts: 175
|
Post by Mega Zenjirou Yoshi on Jun 24, 2013 6:48:50 GMT -5
 First attempt at finished lacing. |
|
AJBryant
New Member
甲冑師 katchuu-shi
Posts: 1,972
|
Post by AJBryant on Jun 24, 2013 11:08:39 GMT -5
But I have a question: Were nodowa ever done in kiritsuke iyo zane? I think it would be nice looking, but have only seen period examples in straight lames or hon kozane. Yes, but only if the rest of the dangly bits were in the same style. And it's looking VERY nice.  |
|
Mega Zenjirou Yoshi
New Member
The Scadian formerly known as Lord Drogo Bryce of Middlefordshire
Posts: 175
|
Post by Mega Zenjirou Yoshi on Jun 24, 2013 17:56:05 GMT -5
Domo arigato gozaimasu Sensei.
Yup, all the dangly bits will be scalloped, with smaller scallops on the nodowa, shikoro and kohire.
|
|
AJBryant
New Member
甲冑師 katchuu-shi
Posts: 1,972
|
Post by AJBryant on Jun 25, 2013 20:40:54 GMT -5
Schveet!
|
|


